Date format
What you should know
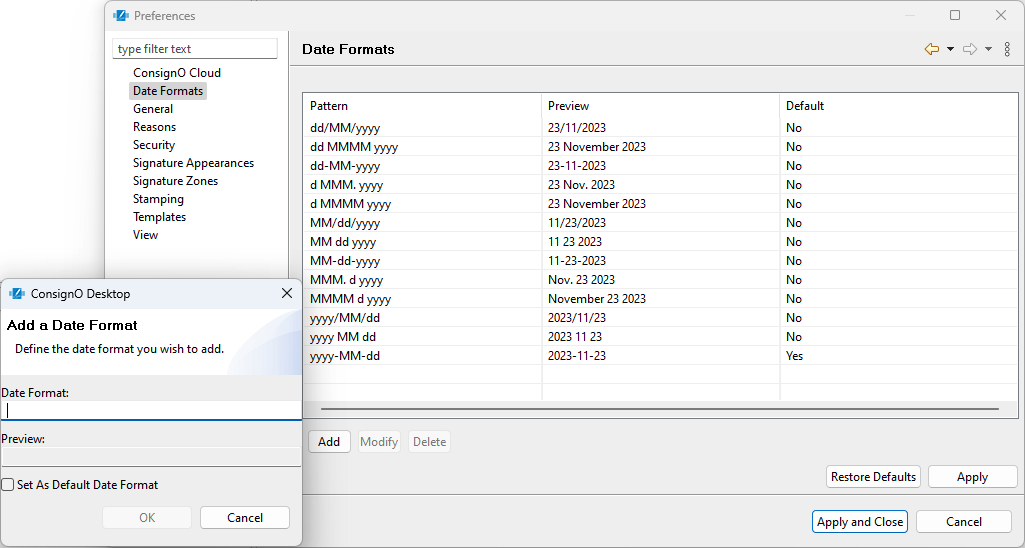
It is possible to set the date format that will appear on your signature appearance at the moment of digitally signing, but you can also set a format for all Signature Appearances that have this option enabled. A list of possible formats is provided but it is also possible to add personalized date formats. (See Signature Appearances)
To modify the Date format preference
- Open the Preferences window.
- Select Date formats in the left panel.
- In the right panel, select the date format that you want to use if it is different than the default format. If none is exactly how you want it, select the closest.
- Click Modify. You can also create a complete new one by clicking Add.

- In the Modify/Create a date format window, enter your format using the following standard character sequences:
- dd: Numeric value (2 numbers) used to identify a specific day, i.e., 02-11-2015.
- d: Numeric value (1 number) used to identify a specific day, i.e., 2-11-2015. However, any number over 10 could still be used, i.e., 23-11-2015.
- MM: Numeric value to identify the month, i.e., 02-02-2015.
- MMM.: Abbreviation followed by a period to identify a specific month, i.e., 2 Sept. 2015.
- MMMMM: To identify a specific month spelled out in full, i.e., 2 September 2015.
- yyyy: Numeric value used to identify the year, i.e. 2 Sept. 2015.
The character sequences can be separated by different symbols. A preview example is provided below the entry field. An error message appears if the format is invalid.
- Check the Set as Default date format box to apply this new format by default to all new signatures.
- Click OK.
- (Optional) You can also select any unwanted format and click Delete to remove it from the list.
- Click Apply or Apply and Close in the Preferences window.
Your Date formats preferences are now configured.
